
Veggie stock is a staple in our home! Purchasing an organic stock is great, but it can get costly if you use it as often as we do. That’s why I started making my own! This vegetable stock recipe is super simple too, you guys!
3 Step Vegetable Stock Recipe
If you would like to start ditching the boxed stock and saving some decent pocket change, check out my simple 3 step process.
Step #1 – Fill it
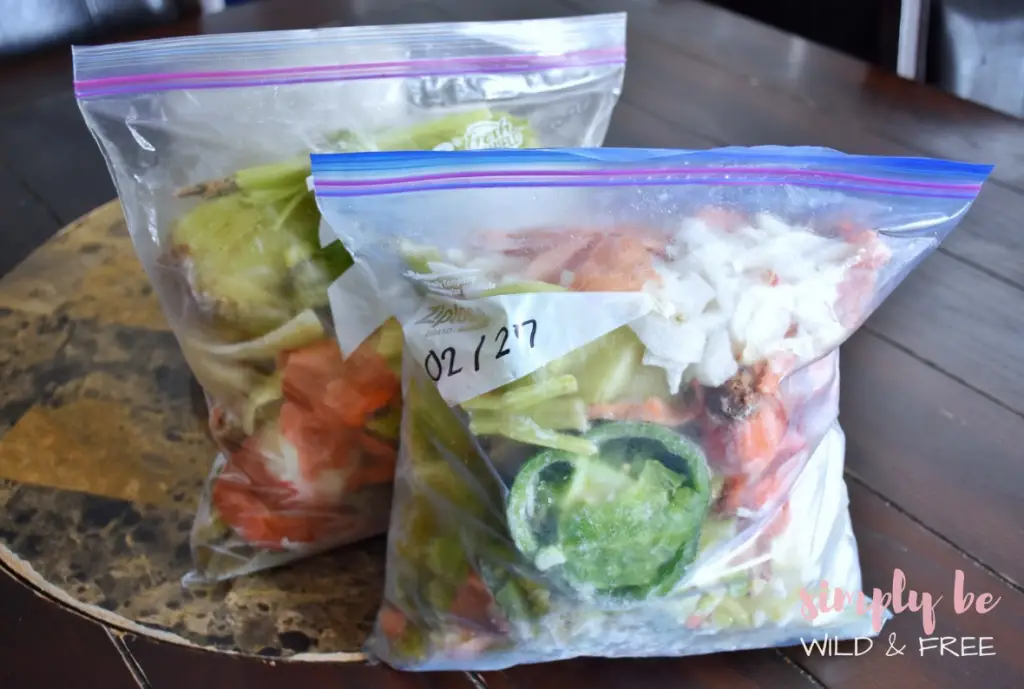
All you need for creating your own veggie stock is vegetable scraps, a gallon freezer bag, and a sharpie – that’s seriously it!
When starting, always make sure you write the date you started your bag on the outside. If you do this, you will eventually get an idea of how long it takes you (on average) to fill up your bags.
We generally fill up 2-3 bags every 4-5 weeks.
Now comes the hard part — remembering to save your scraps!
Each time you cook something with fresh ingredients, simply save the scraps!
Chopped up an onion? Save the skin and outer layer — in the bag it goes!
Peeled some carrots or potatoes? Toss all the extras in the bag!
If you struggle to save your scraps as I did at first, try gathering all your scraps into a bowl while preparing your meals. Using a scrap bowl has helped to save my scraps become second nature to me. I simply throw all my vegetable scraps in the bowl during the meal-making process.
Then, when all the chopping, dicing, and peeling is complete, I pour my scraps into my gallon baggie. Back in the freezer it goes till the next meal. I do this over and over again until I have 2 bags full of veggie scraps.
Step #2 – Cook it

You have 2 overflowing bags stuffed with veggie scraps, now what??
Ok, this step is almost too simple, you guys.
Grab a large stockpot, take those bags of veggie scraps out of the freezer, and dump them straight into the pot.
Phew! Not too bad, right?
Next, cover the scraps with 8 cups of water, turn your burner on to medium-high heat, toss a lid on top, and wait.
Give the stock about 15-20 good minutes to get to a small boil. Using a spoon, push the veggies down into the water as they defrost just so they are barely covered.
Once all the veggies are covered by water and you’ve got a good little bubble going, turn the heat down and let it simmer on low for about 3-4 hours.
By this time the water should be a nice brown color, the vegetables should all be very soft, and there will be a strong savory aroma filling your house.
Step #3 – Store it
Ok, I want to say we have done all the hard work already, and this next part is a breeze.
Sorry guys, but this is definitely the hardest part – for me at least.
Hopefully, you aren’t nearly as clumsy as I am and can do this with ease!
Once you’ve removed the veggie scraps from the stove, you will want to let it sit and rest for a little while. The vegetable stock still needs to be very warm at the end of the straining process.
To complete this veggie stock recipe, you will need to separate the vegetables from the stock by straining them into a large bowl. If your strainer is big enough, carefully pour all of the veggie scraps into the strainer, leaving just the stock into the bowl.
However, If you don’t have a large enough strainer, you may need to improvise and do this in batches. You can use a ladle to pour a little at a time, putting the already drained scraps in a trash bowl before dipping more.
Either way, just make sure you get as much of the liquid drained from the scraps as possible.
More Liquid = More Flavor!
Now, this is where it tends to get a little messy for me.
Straining it once isn’t quite enough.
I like to take all the strained broth through a fine-mesh strainer as well. If you feel like your stock is fine without this step, feel free to skip it!
Using a ladle or measuring cup, pour your homemade veggie stock through a mesh strainer. You can either strain this directly into your storing container or another large bowl.
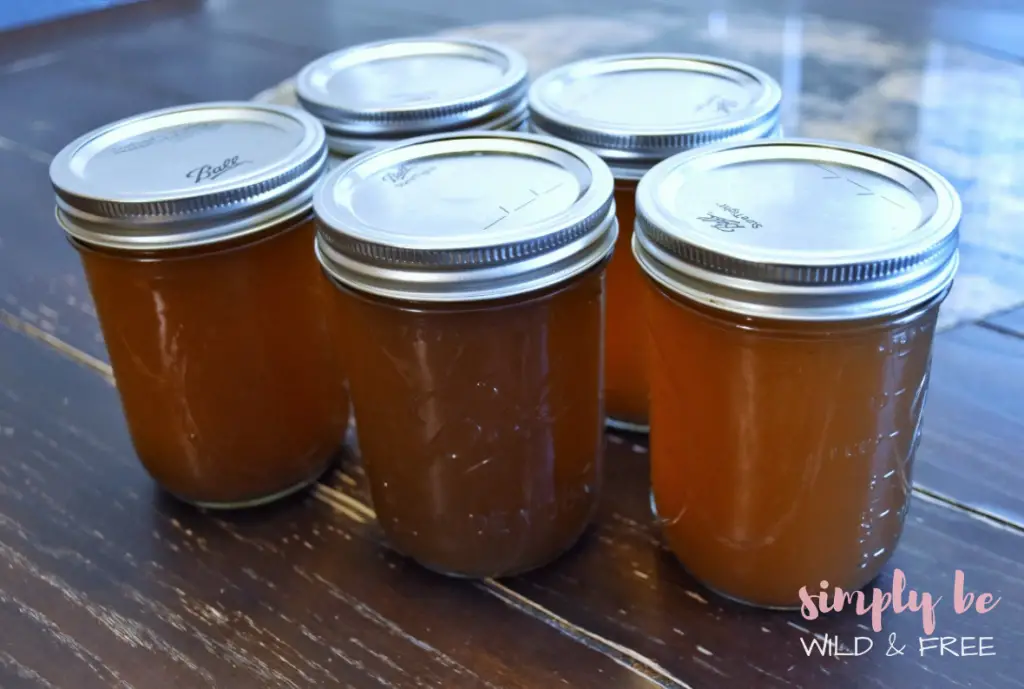
Typically I prefer to pour it straight into a 64 oz mason jar for storing. However, multiple small mason jars work just as well!
Straining this vegetable stock recipe straight into a storing container is definitely the quickest method.
Once all the stock is fully strained, all you need is a little salt! The stock should still be fairly warm and the salt will mix in extremely well.
If using a mason jar for storage (which I highly recommend) screw the lid on tight and let it sit on the counter to cool before popping it in the fridge.
If you don’t have a large enough container to do it all at once, that’s totally fine. You just have to add one simple step.
Once your stock is fully (double) strained into a second large bowl, salt it! Don’t make the mistake of straining it into the individual containers, because you want to salt it all at the same time. This just helps create a more consistent flavor, plus you have less risk of over-salting.
Once salted in the larger container, you can ladle or pour it into your smaller containers. I must say, I tend to make more of a mess adding this extra step. Either way though, I still have delicious tasting stock in the end!
For maximum flavor, let your veggie stock sit in the fridge overnight before using it in a meal.
Love this Vegetable Stock Recipe?
Try using your homemade vegetable stock in my super easy 5 ingredient cabbage soup recipe – a staple meal in our home!
![]()